Eye (EOG) BioAmp Arduino Firmware#
What is Electrooculography (EOG)?#
Electrooculography (EOG) [1] is a technique for measuring the corneo-retinal standing potential that exists between the front and the back of the human eye. The resulting signal is called the electrooculogram. Primary applications are in ophthalmological diagnosis and in recording eye movements. To measure eye movement, pairs of electrodes are typically placed either above and below the eye or to the left and right of the eye. If the eye moves from center position toward one of the two electrodes, this electrode “sees” the positive side of the retina and the opposite electrode “sees” the negative side of the retina. Consequently, a potential difference occurs between the electrodes. Assuming that the resting potential is constant, the recorded potential is a measure of the eye’s position.
To know more about EOG visit here.
Who is this for?#
Anyone who’s using the BioAmp Hardware for the very first time — whether you’re a student, hobbyist, educator or just curious. No experience needed!
👉 To learn about our BioAmp Hardware checkout the hardware page.
Step-by-Step Setup Guide#
With the hardware in your hands, you’re just a few steps away from unlocking its full potential — let’s get the software set up!
Step 1: Downloading GitHub Repository for hardware#
This is the code your Arduino needs to read Eye (EOG) signals.
You have two easy ways to get the code that will help you read your EOG signals:
Simply Download (recommended for beginners)
Go to the GitHub page: Eye BioAmp Arduino Firmware
Click the green “Code” button > Download ZIP
Unzip the folder and save it somewhere easy to find.
Clone using Git (for tech-savvy users)
Install Git for your OS: https://git-scm.com/
Clone this GitHub repository using
git clone https://github.com/upsidedownlabs/Eye-BioAmp-Arduino-Firmware
Step 2: Application Required#
Before you start using the kit, please download or open the following:
Arduino IDE
We need Arduino IDE to upload code to your Arduino board
Link to download IDE for your OS: https://www.arduino.cc/en/software
Chords Website
We will use Chords Website to visualize the Eye Signals!
Open this website: Chords Web
Step 3: Connect Your Hardware#
Plug the Hardware into your Arduino UNO using jumper wires.
Follow the exact wiring diagram from the hardware documentation of the hardware you are using.
Hardwares that are compatible with Eye BioAmp Firmware:
It’s just like putting together a puzzle!
Step 4: Skin Preparation and Electrodes Placement#
Using Gel Electrodes:
Prepare your skin
Choose the area where you’ll place the electrodes.
Clean the skin using an alcohol swab or Nuprep Gel to remove oils and dead cells — this improves signal clarity.
Note
Need help with skin prep? Check out the full guide here: Skin Preparation Guide
For Vertical EOG, attach the wires to the electrodes, then attach the electrodes to skin (refer diagram below):
IN+(positive): Place just below the eye (under the pupil).IN–(negative): Place just above the eyebrow (in line with the pupil).REF(reference): Attach on the bony area near the cheek or behind the ear (as in the diagram).
For Horizontal EOG, attach the wires to the electrodes, then attach the electrodes to skin (refer diagram below):
IN+(positive): Place on the right temple, just outside the right eyebrow.IN–(negative): Place on the left temple, just outside the left eyebrow.REF(reference): Attach on the bony area near the cheek or behind the ear (as in the diagram).
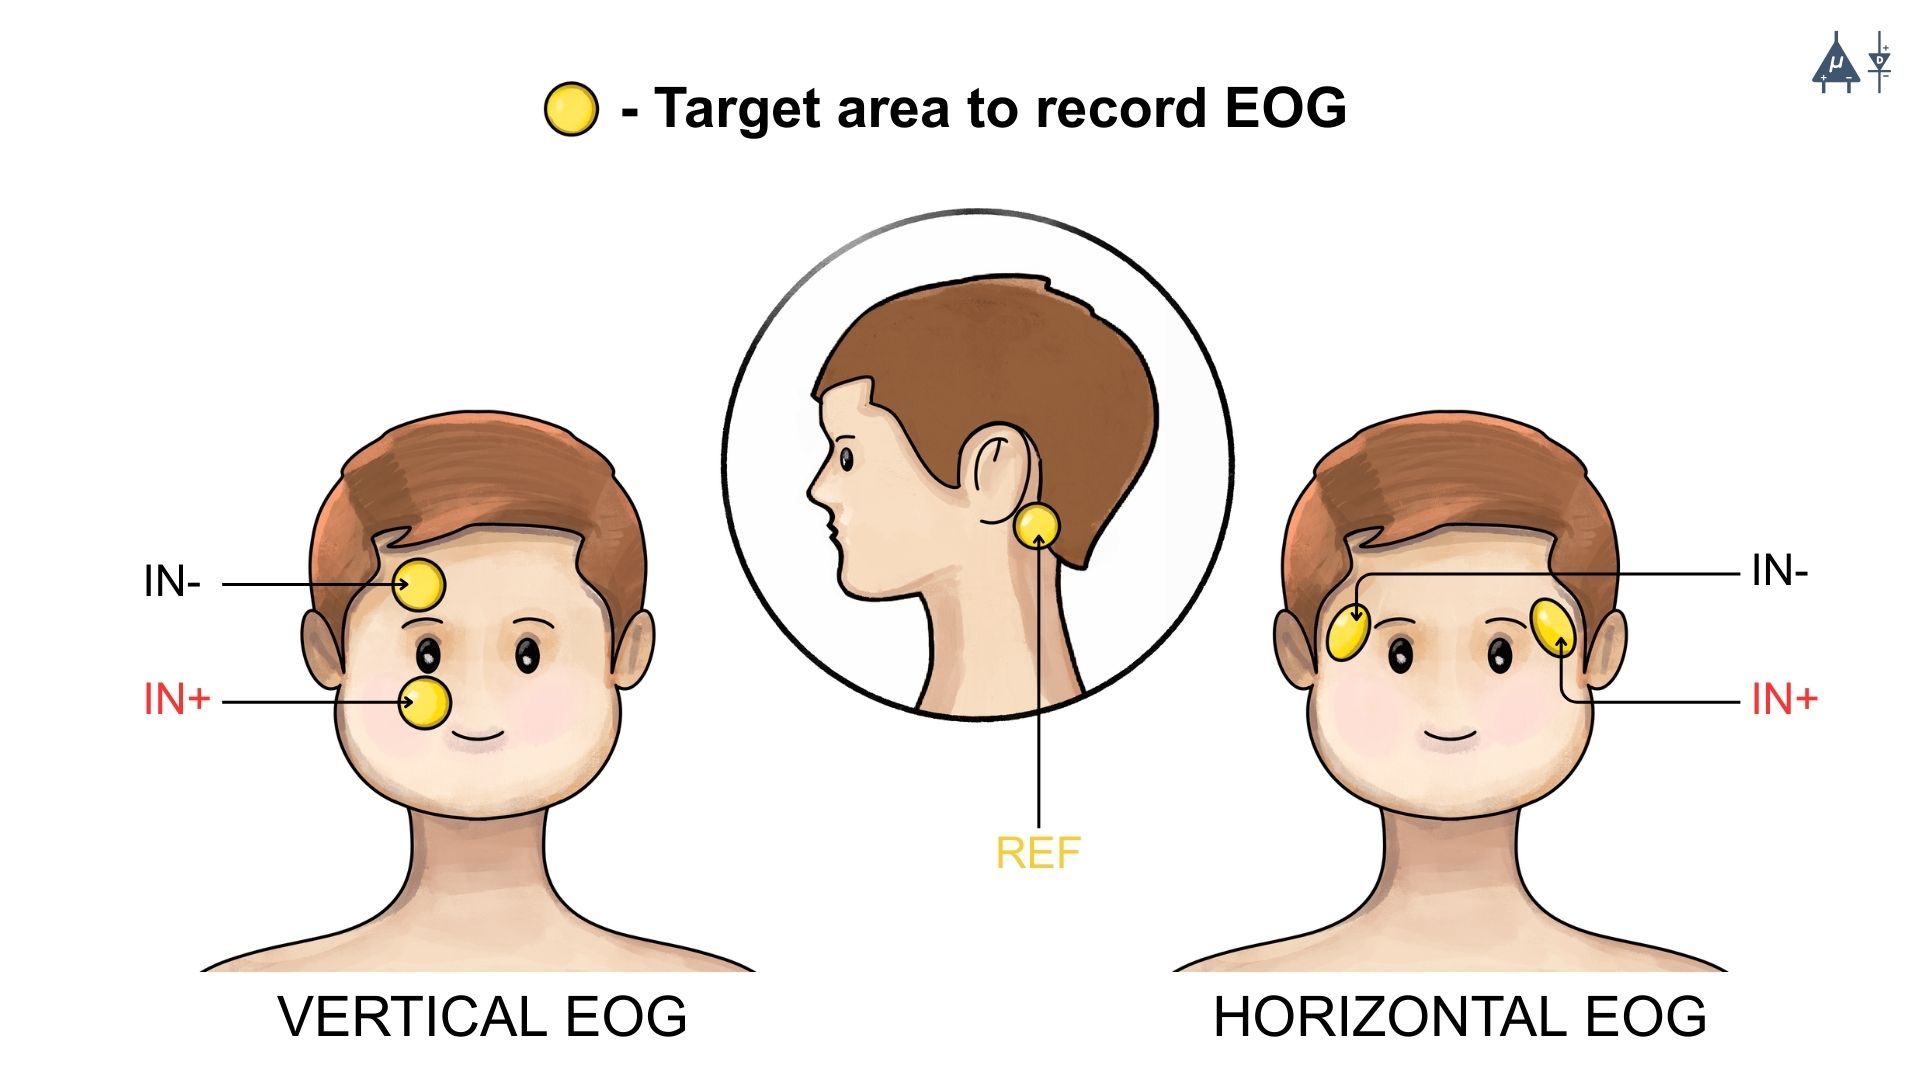
EOG Placement#
Step 5: How to upload the Code to Arduino#
Open the folder you downloaded: Eye-BioAmp-Arduino-Firmware
Inside that, you’ll find several subfolders.
Pick the folder for the experiment you want to try. (For beginners: start with the first one and move step-by-step through the others for a better learning experience )
Inside that folder, open the .ino file using Arduino IDE
For example:
To try raw signal: open
01_FixedSampling.inoTo try filtered signal: open
02_EOGFilter.ino
Note
You’ll find all the experiments listed below, each with step-by-step instructions. Just scroll to the one you’re working on to get started with the right setup.
Connect Your Arduino
Plug your Arduino board into your computer’s USB port using the USB cable.
Wait for the operating system to install any required USB drivers.
In Arduino IDE:
Go to Tools > Board > Arduino UNO choose the model of your board (e.g., “Arduino Uno” or “Arduino Nano” if you wired to a Nano)
Go to Tools > Port > [select the correct COM port]
Verify (Compile) the Sketch
Click the “✔️ Verify” button (or press
Ctrl + R).Wait for “Done compiling.” If errors appear, double-check you opened the correct .ino file.
Click the ✓ Upload (or press
Ctrl + U) button to send the code to your Arduino.The IDE will compile again and then send the code to your board.
The onboard LED labeled “L” may blink during upload. When you see “Done uploading”, the new firmware is running.
Open Serial Monitor and Serial Plotter (Optional)
For serial monitor and plotter, we recommend using Chords Web. However, if you’re learning to develop, you might also find these options useful.
For Serial Monitor: In the IDE, click Tools → Serial Monitor (or press
Ctrl + Shift + M).Ensure the baud rate at the bottom right of the Serial Monitor is set to
115200(or whatever the sketch’s Serial.begin(115200); line specifies).You should start seeing lines of numbers. Those are your readings.
For Serial Plotter: In the IDE, click Tools → Serial Plotter.
You should start seeing plotting of graph and visualize the waves.
Important
Remember to close the Serial Monitor & Serial Plotter in Arduino IDE before starting the Chords Visualizer.
Step 6: Visualize Your Eye Signals!#
Open this website: Chords Web
Click: Visualize Now → then choose Serial Wizard.
Select the correct COM port (same one from Arduino IDE).
Click Connect.
Important
Always disconnect your laptop charger while testing. Why? Charging can introduce 50 Hz noise that affects the signal.
🎉 Now blink your eyes or look side to side — you’ll see real-time EOG waves on the screen!
Let’s explore all the experiments step by step#
1. Fixed Sampling
1. Program Purpose & Overview
The Fixed Sampling program reads the raw electrical signal from the eyes (Electrooculography or EOG) using an analog pin and prints it to the Serial Monitor. It’s useful for understanding what the unfiltered eye signal looks like. Think of it like looking at the “raw ingredients” before cooking.
2. How It Works
analogRead(A0)reads voltage from the Eye BioAmp sensor.Serial.println()prints those values to the computer.A timer ensures values are read at a steady rate (e.g., 500 times per second or 500 Hz).
You can see how blinking or moving eyes changes the waveform.
3. Perform the Hardware
Refer to wiring as per instructions given in Connect Your Hardware
4. Firmware Upload
For this project, navigate to the repository folder (Eye-BioAmp-Arduino-Firmware/1_FixedSampling) and select
1_FixedSampling.ino.To upload firmware, refer to How to upload the Code to Arduino
5. Visualize your signal
Follow the steps given in Visualize Your Eye Signals!
6. Running & Observing Results
A stream of numbers.
Looking up/down → sudden voltage change.
Blinks → sharp spikes.
Checkout Demo Visualization on YouTube:
Note
To learn more about this project, visit our Instructables page: Visualizing Electrical Impulses of Eyes (EOG) Using BioAmp EXG Pill
2. EOG Filter
1. Program Purpose & Overview
The EOG Filter program cleans the raw signal by removing slow drift (DC offset) and high-frequency noise. It gives a more accurate view of intentional eye movements.
2. How It Works
Uses a bandpass IIR filter (0.5 Hz to 19.5 Hz).
Stores several recent samples in an array (circular buffer).
For each new reading, calculates a weighted average using filter coefficients.
Prints filtered values to Serial Monitor.
To learn more about filters and how to generate new filters, visit: https://docs.scipy.org/doc/scipy/reference/generated/scipy.signal.butter.html
3. Perform the Hardware
Refer to wiring as per instructions given in Connect Your Hardware
4. Firmware Upload
For this project, go to the repository folder (Eye-BioAmp-Arduino-Firmware/2_EOGFilter) and select
2_EOGFilter.ino.To upload firmware, refer to How to upload the Code to Arduino
5. Visualize your signal
Follow the steps given in Visualize Your Eye Signals!
6. Running & Observing Results
A smoother, more stable signal.
Eye blinks and movement are easier to detect visually.
3. Drowsiness Detection
The Drowsiness Detection sketch helps detect drowsiness or sleepiness by measuring blink intervals. If someone doesn’t blink for a long time or their eye remains closed, the system can raise an alert (e.g., buzz).
It continuously reads EOG signal.
Calculates the signal envelope (peak activity).
If envelope is above a blink threshold, it counts as a blink.
Measures time between blinks.
If time exceeds a set limit → triggers buzzer.
For a detailed walkthrough, follow along with the YouTube tutorial for this project:
Note
To learn more about this project, visit our Instructables page: Drowsiness Detector by Detecting EOG Signals Using BioAmp EXG Pill
4. EOG Photo Capture BLE
To be documented.
5. Eye Blink Detection
The Eye Blink Detection program detects individual eye blinks in real-time and activates an output, like a buzzer or LED. Great for making blink-based interfaces!
Continuously samples the filtered EOG waveform and applies a dynamic threshold + hysteresis to catch the rapid voltage swings caused by an eyelid closing. Whenever the signal crosses the blink threshold, the firmware immediately flags a “blink event” and drives a configurable digital output (LED, buzzer, relay or serial message).
Because it operates in real‑time on the microcontroller, you get sub‑50 ms latency from physical blink to output trigger—perfect for responsive, blink‑based user interfaces or assistive‑tech prototypes.
For a detailed walkthrough, follow along with the YouTube tutorial for this project:
Note
To learn more about this project, visit our Instructables page: Eye Blink Detection by Recording EOG Using BioAmp EXG Pill
6. EOG DinoGame
The EOG DinoGame program controls Chrome Dino Game with your eye blinks!
Transforms your blinks into game inputs for Chrome’s offline “Dino Run.” The Arduino runs the same blink‑detection algorithm as above, but instead of an onboard LED it sends a simple code over USB serial for each blink.
A companion script on your PC listens on the COM port and synthesizes a space‑bar keypress whenever a blink event arrives—letting you jump over cacti and dodge pterodactyls using only your eyes. It’s a fun demo of how EOG can drive full applications with no hands at all.
Uses serial communication or USB HID to simulate a jump action when you blink.
Note
To learn about this project, visit our Instructables page for detailed guide: Control Dino Game Using Eye Blinks (EOG)
Checkout our YouTube video, to know how it looks :
7. EOG Servo Control
The EOG Servo Control sketch maps eye blinks to physical motion—e.g., controlling a servo claw with eye input.
Maps individual blinks (or blink patterns) to precise servo motions for mechanical actuation. Blink events are detected exactly as in the Eye Blink Detection sketch, but here each blink pulses a hobby‑servo control signal (via Arduino’s Servo library) to move to a predefined angle.
You can configure single‑blink/double‑blink sequences to open and close a gripper, nod a toy head, or point an indicator—showcasing simple, hands‑free robotics driven entirely by your eye movements.
Note
To learn about this project, visit our Instructables page for detailed guide: Control a Servo Claw Using Your Eye Blinks (EOG)
8. Vertical Eye Movement Detector
The Vertical Eye Movement Detector firmware detects upward and downward eye movements using EOG signals captured by the Eye-BioAmp sensor. It is useful for applications where vertical eye gestures are mapped to specific control functions, such as assistive device interaction or simple user interfaces.
For a detailed walkthrough, follow along with the YouTube tutorial for this project:
Note
To learn about this project, visit our Instructables page for detailed guide: Detecting UP and DOWN Movements of Eyes Using EOG
✅ And That’s it!, Congrats on making your neuroscience project using BioAmp Hardware.